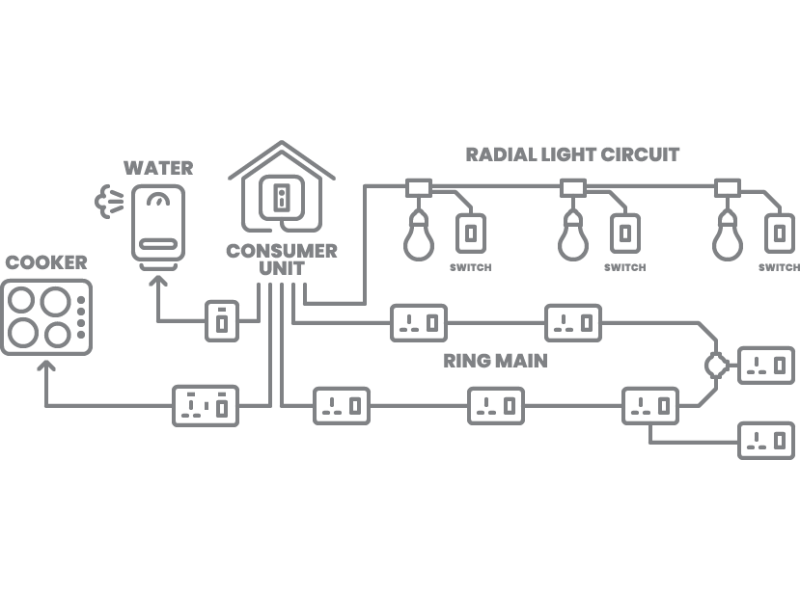
1. Why a Wiring Diagram Is Essential
Before any installation begins, drawing up an electrical wiring diagram is critical. This plan shows:
- Where each outlet, switch, and light fixture will be located
- How circuits connect within the breaker panel (VRU or service panel)
- Which cables (and their sizes) to use for specific loads
- Protective devices, such as breakers and RCDs (GFCIs), that safeguard the system
A carefully prepared wiring diagram reduces confusion, helps ensure a code-compliant setup, and streamlines the entire installation process.
2. Outlining the Basic Steps
Mark Fixture and Device Locations
- On a floor plan, label each outlet, switch, light, distribution box, and panel location.
- Group circuits by function (lighting, general outlets, dedicated lines for major appliances).
Draw Connections (Circuit Paths)
- Use lines to represent where each cable run will go and label them for identification.
- Note potential cable routes vertically or horizontally to meet code requirements and ease future maintenance.
Evaluate Loads and Group Circuits
- Large appliances (e.g., a washing machine, electric range) often require dedicated circuits.
- Smaller rooms may share lighting or outlet circuits if total load remains within safe limits.
Size Your Wires and Breakers
- Calculate maximum current (Amps) in each circuit to determine cable cross-section and breaker rating.
- Apply safety margins to ensure cables won’t overheat during short-term overloads.
Plan for the Breaker Panel (Service Panel / VRU)
- Each group or subcircuit connects to the main distribution panel.
- Protective devices (breakers, RCDs/GFCIs, or combined RCBOs) secure each circuit against overloads and ground faults.
3. Connecting Circuits to the Main Panel
Your home’s power feed typically arrives via:
- 3-wire cable: Phase (L), Neutral (N), and Ground/PE (if available).
- If no utility-supplied ground is present, homeowners may install a ground rod and bonding system.
Inside the main breaker panel (or VRU):
- Main Breaker (QF1) controls power to the entire house.
- Meter (PI) may be inside or outside the home. If it’s external (e.g., on a utility pole), you can still add an internal meter for personal reference.
- Bus Bars: Separate bars for Neutral (N) and Ground (PE) (or combined under some systems, e.g., TN-C-S).
- Branch Circuit Breakers: Each circuit is fed through an individual breaker (QF2, QF3, etc.).
- Residual Current Devices (RCD/GFCI) or RCBOs (RCD + Breaker) protect against electric shock and leakage currents.
Example:
- Lighting circuit: 1-pole breaker, no dedicated RCD (common practice).
- Outlet circuit: RCD or RCBO for ground-fault protection.
- High-power circuit (e.g., oven): Dedicated breaker sized to load, typically 20-50A or higher, depending on local codes.
4. Calculating Wire Size and Breaker Ratings
When sizing conductors:
- Compute the Load (Watts)
- Estimate total load (W) on that circuit.
- Example: 3.3 kW total load → 3.3 kW / 230 V ≈ 14.3 A.
- Select Breaker Current
- Add a safety margin. If the load is about 14-15 A, a 16 A breaker might suffice.
- However, short bursts up to 1.45 × breaker rating (≈ 23 A for a 16 A breaker) can occur.
- Choose Cable Cross-Section
- Cables must handle potential overloads without excessive heating.
- Typically, for a 16 A breaker, 2.5 mm² copper is recommended instead of 1.5 mm².
- This ensures thermal safety and compliance with code.
Rule of Thumb: The conductor must safely carry 1.45 × the breaker’s nominal current without damage.
5. Wiring Methods in a Private House
5.1 Concealed vs. Open Wiring
- Concealed:
- Wires run behind walls, in chases, or under plaster.
- Aesthetic but less accessible for repairs.
- Open:
- Wires run on surfaces, inside protective channels or raceways.
- Easier to modify or troubleshoot, but more visible.
5.2 Potential Locations for Cable Runs
- In Walls (often via chases/“штробы”)
- Wires or conduits are plastered over.
- On Ceilings
- Easy for lighting circuits, especially with drop or suspended ceilings.
- Under Floors
- Cables laid in conduit/“heavy-duty” flexible tubing, then covered by screed.
- Still need vertical runs for outlets and switches.
For Wooden Structures:
- PUЭ (Russian wiring code) generally requires metal conduits if wiring is fully concealed in flammable materials.
- Open wiring might be simpler in timber construction.
6. Example Diagram and Sequence
- Mark Device Locations (outlets, switches, fixtures) on the plan.
- Draw Basic Connections (phase, neutral, ground) from the main panel to each group.
- Assign Breakers (lighting circuit vs. outlet circuit vs. high-power circuit).
- Protective Devices:
- GFCI or RCD for outlets.
- Possibly skip RCD on lighting circuits if local code allows.
- Use RCBO or separate breaker + RCD combos as needed.
- Select Cable Gauge:
- E.g., 2.5 mm² for a 16-20 A breaker (general outlet circuit).
- 1.5 mm² for lighting (10 A or 16 A breaker).
- 4-6 mm² or larger for heavy loads (stoves, water heaters, AC).
7. Practical Installation Tips
- Use vertical and horizontal routes only. This helps future detection of wire paths.
- Maintain clearances: e.g., at least 4-6 inches (10-15 cm) below ceiling level.
- Outlet Height: Commonly 12-31 inches (30-80 cm) from the floor.
- Label everything: Circuit numbers, cable runs, and breaker panel listings to simplify maintenance.
- Photograph or document final runs before plastering or covering them.
8. Final Thoughts: Building a Safe, Reliable System
Developing a detailed wiring diagram and following best practices ensures:
- Sufficient Circuit Segmentation
- Prevents overloading a single line.
- Eases future expansions or troubleshooting.
- Proper Cable Sizing
- Reduces fire risk and voltage drop issues.
- Adequate Protection
- Breakers, RCDs/GFCIs, and proper grounding keep everyone safe.
- Compliance
- Adhering to local codes (e.g., NEC, or national rules in your region) avoids legal and insurance complications.
Pro Tip: If you’re unsure about any calculations or code specifics, consult a licensed electrician. Good planning and professional execution lead to a safe, comfortable home.
Where to Get Quality Electrical Components?
At safsale.com, we provide:
- UL-/CE-listed cables, breakers, and accessories for private homes
- Conduit systems for concealed or open wiring
- GFCIs, RCBOs, and surge protectors for complete protection
- Expert assistance to help you choose the right components for your local codes and project scale
Visit safsale.com for all your home wiring needs-building a secure, efficient electrical setup has never been easier!