Insulation Resistance Testing – Best Practices, Equipment, and Safety Guidelines
Electrical insulation is a critical component in any wiring system, ensuring safety by preventing current leakage, electrical shocks, and fire hazards. Over time, insulation degrades due to heat, moisture, mechanical stress, and environmental factors.
To maintain a safe electrical system, regular insulation resistance testing (IR testing) is essential. This guide covers the required equipment, testing methods, NEC compliance, and proper documentation.
1. What is Insulation Resistance Testing?
Insulation resistance testing is a process used to determine how well the insulation on wires, cables, and electrical components prevents current leakage. It is measured in megohms (MΩ) and helps detect degradation or damage before failure occurs.
Why is Insulation Resistance Testing Important?
- Prevents electrical shock and fire hazards.
- Detects insulation deterioration before failures occur.
- Ensures compliance with NEC (National Electrical Code) and NFPA 70E safety standards.
- Required for new electrical installations, routine maintenance, and post-repair inspections.
Minimum Acceptable Resistance Values (NEC Standards)
- For wiring up to 1000V: Minimum 0.5 MΩ insulation resistance.
- For motors and transformers: Resistance should be at least 1 MΩ per kV of operating voltage.
- For low-voltage control circuits: Minimum of 1 MΩ recommended.
2. Equipment for Insulation Resistance Testing
The Megohmmeter (Insulation Tester)
A megohmmeter (megger) is the primary tool for insulation resistance testing. It applies high DC voltage to the insulation and measures the resulting leakage current to calculate resistance.
Common Megohmmeter Test Voltages:
| Voltage Rating | Typical Use Case |
|---|---|
| 100V | Low-voltage control circuits, telecom cables |
| 250V | Electronic circuits, appliance wiring |
| 500V | Standard residential and commercial wiring (up to 600V) |
| 1000V | Motors, transformers, higher voltage equipment |
| 2500V+ | Medium- to high-voltage industrial applications |
Additional Testing Accessories:
- Insulated test leads and alligator clips for safe connections.
- Protective gloves and safety glasses to prevent electrical shock.
- Grounding rods or cables for discharging residual voltage after testing.
3. Insulation Resistance Testing Procedure
Step 1: Preparation and Safety Measures
- Shut off power to the circuit and confirm with a voltage tester.
- Disconnect any sensitive electronic equipment to prevent damage.
- Label and isolate the conductors being tested.
- Ensure proper personal protective equipment (PPE) is worn.
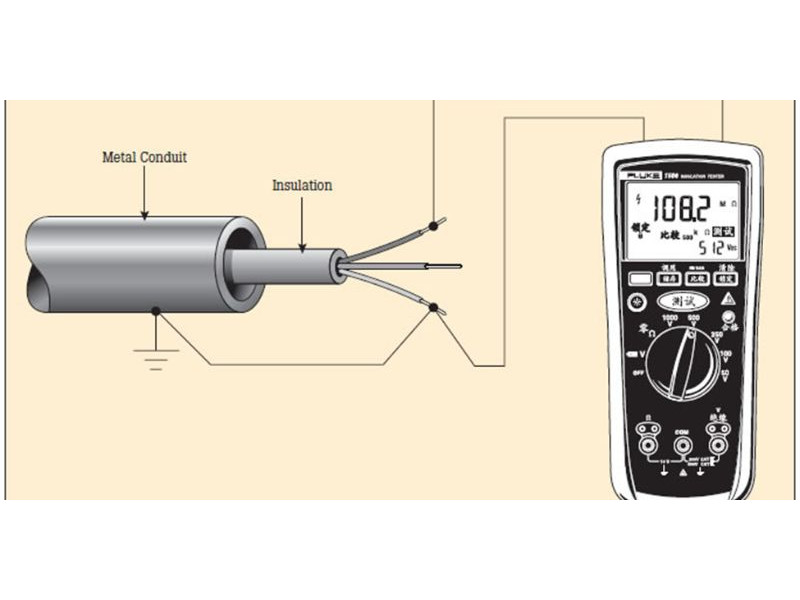
Step 2: Performing the Insulation Test
Connect the Megohmmeter:
- One lead to the conductor being tested.
- The other lead to the ground or neutral reference.
Apply Test Voltage:
- Select the appropriate test voltage based on the circuit rating.
- Press and hold the test button for at least 60 seconds.
Observe Readings:
- High resistance (100 MΩ+): Excellent insulation condition.
- Moderate resistance (1-99 MΩ): Insulation is functional but may be deteriorating.
- Low resistance (<1 MΩ): Insulation failure risk; replacement required.
Perform Multiple Tests:
- Test phase-to-phase and phase-to-ground for a complete assessment.
- Repeat the test after 15 seconds and 60 seconds to check for moisture-related faults (absorption ratio test).
Step 3: Discharge the System
- After testing, discharge the circuit by grounding the tested conductor using an insulated grounding rod.
- Never touch the test leads immediately after testing, as residual charge may remain.
4. Recording and Analyzing Results
Test Report Requirements:
All insulation resistance tests should be documented for compliance and future maintenance planning.
A standard IR testing report should include:
- Test date and location
- Temperature and humidity conditions
- Equipment tested (wiring, motors, switchgear, etc.)
- Test voltage applied
- Measured resistance values
- Pass/Fail status
- Inspector’s signature and company details
Interpreting Results – When to Take Action
| Resistance Value | Condition | Action Required |
|---|---|---|
| 100 MΩ+ | Excellent | No action needed |
| 10 – 99 MΩ | Good | Monitor periodically |
| 1 – 9 MΩ | Marginal | Investigate potential issues |
| <1 MΩ | Poor | Immediate repair or replacement |
5. NEC and NFPA Compliance for Insulation Testing
National Electrical Code (NEC) Requirements
- NEC 110.3(A)(1): Insulation testing must be performed before commissioning new electrical installations.
- NEC 250.4(A)(5): Grounding and bonding must be verified to ensure proper electrical safety.
- NEC Article 500: Industrial and hazardous environments require specialized insulation resistance testing.
NFPA 70E (Electrical Safety Standards)
- Workers must follow lockout/tagout (LOTO) procedures before testing.
- Use of Class 0 rubber gloves is mandatory for circuits above 50V.
- Testers must maintain a safe working distance from energized parts.
6. How Often Should You Test Insulation Resistance?
| Electrical System | Recommended Testing Frequency |
|---|---|
| New wiring installations | Before energization |
| Residential wiring | Every 3-5 years |
| Commercial buildings | Annually |
| Industrial plants | Every 6-12 months |
| Motors and transformers | Before startup and every 3 months |
Regular testing prevents costly breakdowns and electrical hazards. Schedule periodic IR testing to ensure compliance and system reliability.
Final Thoughts
Performing insulation resistance testing is essential for electrical safety and equipment longevity. By following NEC-compliant methods, using the correct megohmmeter, and maintaining proper documentation, you can identify potential failures before they become hazardous.
For professional-grade megohmmeters, test leads, and electrical safety equipment, visit safsale.com for expert-recommended solutions.
Electrical safety starts with proper testing – don’t overlook insulation resistance testing!