DIY Home Electrical Wiring – Step-by-Step Guide
Planning to do electrical wiring in your home on your own? While it's a challenging task, following the right steps can help you achieve a safe and reliable electrical system. This guide will walk you through everything from creating a wiring plan to selecting materials and performing the installation.
Safety should always be your top priority when working with electrical systems. If at any point you feel uncertain, consider calling a professional electrician.
Step 1: Create a Wiring Plan
The first step in installing electrical wiring is to plan where you’ll place your electrical fixtures:
- Light fixtures
- Outlets
- Switches
Start with a floor plan of your home or room, and mark the locations of furniture and appliances. This will help you determine the most convenient and functional places for outlets and switches. For example, you’ll want to place outlets where you'll likely have a TV, computer, or kitchen appliances.
Pro tip: Avoid placing outlets behind large furniture or in hard-to-reach spots. Also, check for building restrictions in multi-story or multi-unit homes to ensure you don’t compromise structural integrity.
Step 2: Draw Your Wiring Diagram
Once you’ve decided on the locations of your outlets and switches, draw a wiring diagram to show how they will connect.
This step is crucial because it will guide you through the installation process and help you avoid mistakes. It will also make it easier to troubleshoot any issues later.
Your wiring diagram should include:
- Power sources (main panel and circuit breakers)
- Wiring routes for each outlet and switch
- Lighting circuits
Step 3: Choose the Right Materials
At this point, you need to select the appropriate materials based on the type of wiring you’ll be using.
There are two main types of wiring systems:
- Hidden (concealed) wiring – Installed inside walls, floors, or ceilings.
- Open (exposed) wiring – Mounted on the surface of walls, commonly used in utility areas.
Important considerations:
- Use only copper wires for durability and better conductivity.
- For hidden wiring, choose non-flammable cables like VVGng 3x1.5, where:
- "3" indicates the number of conductors
- "1.5" refers to the cross-sectional area in square millimeters
- "ng" stands for "non-flammable"
Avoid Multi-strand Wires
While multi-strand wires (like ShVVP) are great for flexible cords, they are unsuitable for fixed wiring. Instead, use single-core wires for greater safety and reliability.
Step 4: Circuit Protection and Safety
For each circuit, you must install a circuit breaker (automatic switch) to protect against short circuits and overcurrent. Choosing the right breaker rating is critical. For instance:
- 1.5 mm² wire should be protected by a 10A breaker, not a 15A breaker.
- Although 1.5 mm² wire can handle 15A temporarily, it may overheat before the breaker trips, causing insulation damage and potentially starting a fire.
Key Safety Components:
- Residual Current Devices (RCDs): Protect against electric shock.
- Overcurrent Circuit Breakers: Prevent overheating and fires caused by excess current.
- Surge Protectors: Shield appliances from voltage spikes.
In homes with wooden walls, extra precautions are needed, such as installing wiring in metal conduits to reduce fire risk.
Step 5: Installation Process
Once you’ve prepared your plan and gathered the necessary materials, it’s time to start the installation.
1. Marking the Wall
Use your wiring diagram to mark the exact locations for switches, outlets, and cable routes on the wall.
2. Create Channels for Hidden Wiring
If you’re installing concealed wiring, cut channels (also called “chases”) into the wall using a wall chaser. Ensure you comply with building regulations to avoid damaging structural elements.
3. Lay the Cables
Run the cables according to your plan. Be sure to:
- Use PVC conduits for protection and easy maintenance.
- Avoid sharp bends and keep cables away from heat sources.
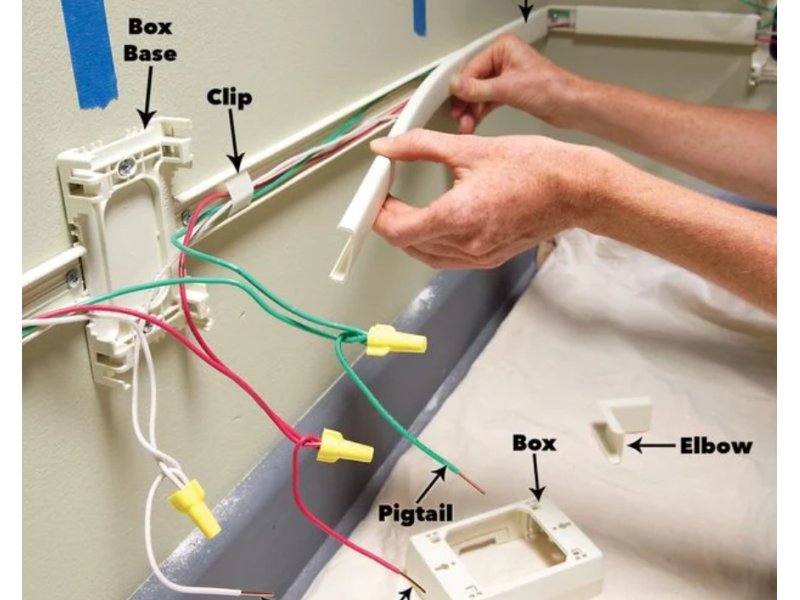
4. Install Outlets and Switches
Secure outlets and switches in place, ensuring that connections are tight and free from exposed wire strands.
5. Connect to the Main Panel
Carefully connect your wiring to the main panel. Make sure the circuit breakers and RCDs are installed correctly.
Step 6: Testing and Inspection
After completing the installation, thoroughly test the system before turning on the power:
- Use a multimeter to check for proper voltage at each outlet and switch.
- Ensure all circuit breakers trip as expected when overloaded.
- Verify that the RCDs respond correctly to ground faults.
Final Inspection
A professional inspection is highly recommended to ensure your work meets electrical codes and safety standards.
Tips for a Safe and Reliable Electrical System
- Follow Local Electrical Codes: Each country or state may have different requirements, especially for grounding and circuit protection.
- Plan for Future Expansion: Consider installing extra circuits for future appliances or renovations.
- Use High-Quality Materials: Don’t skimp on wires, outlets, or circuit breakers. Cheaper options may compromise safety and durability.
- Document Everything: Keep a copy of your wiring diagram and take photos of the installation process for future reference.
Conclusion
Installing electrical wiring in your home can be a rewarding project if done correctly. With a solid plan, the right materials, and a focus on safety, you can create a system that will serve you reliably for years.
If you need high-quality electrical components and tools, visit safsale.com for a wide selection of products.
Remember: Safety first! If you’re ever unsure about a step, don’t hesitate to consult a professional electrician.