Replacing Apartment Wiring – A DIY Guide
Replacing outdated wiring in an apartment—especially in older panel buildings—can be a challenging but essential project to ensure safety and support modern electrical loads. Many older systems, often installed decades ago with aluminum conductors and outdated connection methods, no longer meet the demands of today’s appliances. This guide provides a detailed, step-by-step process for replacing your apartment wiring safely and in accordance with current U.S. electrical standards such as the National Electrical Code (NEC).
For premium components and further expert advice, visit safsale.com.
1. When Is Wiring Replacement Necessary?
Signs That Your Wiring Needs an Upgrade:
Overloaded Circuits:
Older wiring systems were often rated for 7–10 A per circuit. Today’s kitchens and living spaces may require 12–15 A or more, especially when high-power appliances are used.Aging Materials:
Many older apartments still use aluminum wiring with PVC insulation that has exceeded its useful life. Aluminum’s susceptibility to corrosion and mechanical fatigue increases the risk of loose connections and overheating.Poor Connections:
Traditional connection methods like cold splicing (twisting wires together) create high-resistance joints that generate heat. Repeated cycling leads to oxidation and eventual failure.Frequent Tripping of Protective Devices:
Constant trips of circuit breakers or GFCIs indicate that the wiring cannot handle current demands, often due to deteriorated insulation or weak connections.
2. Pre-Replacement Preparation
a. Planning and Documentation
Before starting any wiring replacement, create a detailed schematic of your current system and plan the new layout. Include:
- Locations for outlets, switches, and fixtures.
- Power load requirements for each circuit, especially for high-power appliances (e.g., electric ranges, water heaters, HVAC systems).
A proper plan minimizes disruptions and ensures the new system will meet your needs for decades.
b. Obtain Necessary Permits and Approvals
In many jurisdictions, significant electrical work must be documented and approved by local building authorities. Ensure you:
- Submit your wiring schematic for review.
- Obtain any necessary permits before beginning work.
- If you’re in a multi-unit building, coordinate with your property management.
3. Selecting Materials and Components
a. Wires and Cables
For modern U.S. installations, use high-quality copper wiring for its superior conductivity and durability. Choose cables that are UL-listed and compliant with NEC requirements:
- NM (Non-Metallic Sheathed) Cable (Romex®):
Ideal for interior wiring. - UF (Underground Feeder) Cable:
Use for outdoor or damp areas.
b. Cable Sizing
Cable size is determined by the expected load. Refer to NEC tables for ampacity. Common guidelines include:
- Lighting Circuits: Typically use 14 AWG or 12 AWG copper.
- General Outlets: Use 12 AWG wiring.
- High-Power Appliances: May require 10 AWG or 8 AWG cables.
For example, if your kitchen load is calculated to be around 12,000 watts on a 240V circuit, use:
Ensure the cable’s ampacity exceeds this value.
c. Protective Devices
Select circuit breakers, GFCIs, and AFCIs based on the load of each circuit. High-power appliances must have dedicated circuits with appropriately rated breakers. The protective devices should be installed in the main distribution panel (load center).
4. Developing the New Wiring Scheme
Design your new wiring schematic with careful attention to:
- Circuit Division:
Separate circuits for lighting, general outlets, and high-power appliances. - Device Placement:
- Kitchen Outlets: Consider multiple levels; for example, outlets for countertop appliances should be at about 15–20 inches above the surface, while general outlets should be around 12 inches above the floor.
- Switches: Install at approximately 31–35 inches above the floor.
- Routing:
Plan cable routes that are straight and avoid unnecessary bends. Mark paths on the floor plan to determine exact cable lengths.
A clear schematic will streamline both the installation process and future troubleshooting.
5. Removing the Old Wiring
Step-by-Step Demolition:
- Cut Off the Power:
- Turn off the main circuit breaker and verify with a non-contact voltage tester.
- Remove Outlets and Switches:
- Carefully detach old outlets, switches, and junction boxes.
- Expose the Wiring:
- In panel buildings, wiring may be hidden in channels within walls or ceilings. You may need to remove some plaster or drywall without compromising structural integrity.
- Dispose of Old Materials:
- Ensure that all old wiring, especially aluminum cables, is removed to avoid future hazards.
6. Installing the New Wiring
Step 1: Marking and Layout
- Mark Device Locations:
Use a marker to outline where outlets, switches, and the distribution panel will be installed. - Plan Cable Routes:
Draw the planned paths on walls and ceilings, leaving at least a 5% extra length for adjustments.
Step 2: Running the New Cables
- Open Wiring:
- Use NM cable (Romex®) in surface-mounted conduits or cable trays along walls and ceilings.
- Concealed Wiring:
- For a clean finish, cut channels in walls using a wall chaser, lay the cables, and then cover them with drywall or plaster.
- Maintain Proper Orientation:
- Ensure cables run perpendicular to walls and avoid sharp bends to reduce stress and overheating.
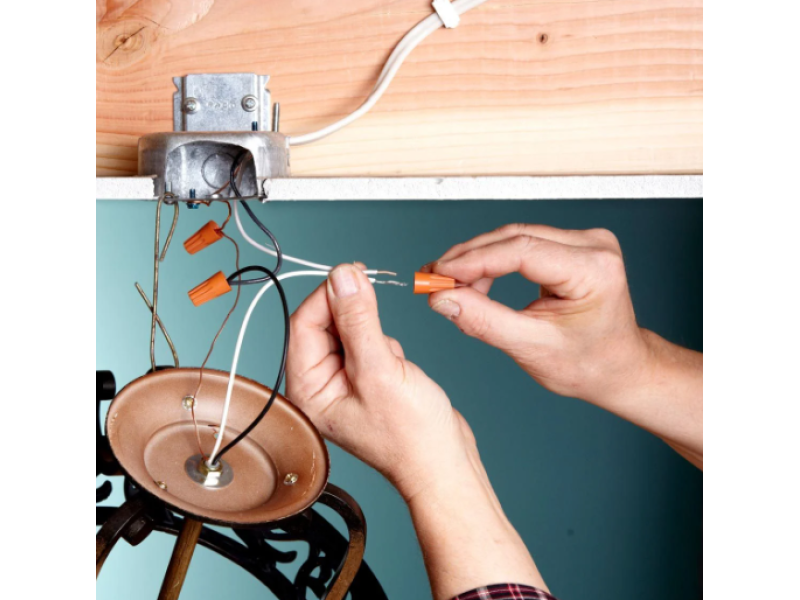
Step 3: Installing Outlets, Switches, and Fixtures
- Mount Electrical Boxes:
Secure them at marked locations. - Connect Devices:
Strip and connect wires to outlets, switches, and light fixtures according to the wiring schematic. Ensure all connections are tight and insulated properly. - Follow Height Guidelines:
- Outlets: Approximately 15–20 inches above countertops or 12 inches above the floor.
- Switches: Around 31–35 inches above the floor.
Step 4: Connecting to the Distribution Panel
- Route Each Circuit:
Connect wiring from the new outlets and fixtures to the main distribution panel. - Install Protective Devices:
Each circuit should have its own breaker, with GFCI/AFCI protection as required. - Label Circuits:
Clearly label each circuit in the panel for future reference and troubleshooting.
Step 5: Testing and Inspection
- Continuity and Voltage Testing:
Use a multimeter to check that each circuit is continuous and that correct voltage is delivered at all outlets. - Safety Verification:
Test RCDs and circuit breakers to ensure they trip appropriately under fault conditions. - Final Inspection:
A licensed electrician should inspect the installation to confirm compliance with NEC standards and local codes.
7. Conclusion
Replacing old wiring in your apartment is a complex but essential project, particularly when outdated systems no longer meet modern load demands. By following a systematic process—starting with thorough planning and load calculations, selecting UL-listed copper NM cables, developing a detailed wiring schematic, and methodically installing the new wiring—you can upgrade your electrical system safely and reliably.
For top-quality electrical components and more detailed DIY wiring guides, visit safsale.com. Remember, if you’re ever uncertain about any step, consult a licensed electrician to ensure your project complies with all safety standards and codes.
Safety is paramount – when in doubt, always hire a professional!