1. Why You Should Manage Electrical Wiring Yourself
Many new construction (new-build) apartments come in a “bare-shell” or “unfinished” state, with only basic utility lines provided. This gives homeowners the flexibility to design their electrical wiring layout to suit personal needs.
While some developers or contractors may offer in-house wiring services, their solutions often rely on budget-friendly materials and minimal circuit protection, resulting in potential issues like:
- Subpar Breakers and RCDs – Cheap devices may lead to overheating or arcing, jeopardizing safety.
- Minimal Circuits – Some developers only provide 1–2 breakers for an entire apartment. A well-designed system usually needs 4–6 or more dedicated circuits.
- Undersized Cables – Low-cost wire with smaller-than-advertised conductors can overheat.
- Lack of Compliance – Some installations ignore best practices (strictly vertical/horizontal cable runs, no diagonal lines, properly sized conduits, etc.).
By taking charge of or supervising your apartment’s wiring, you ensure quality materials, compliance with code, and a wiring scheme tailor-made for your lifestyle.
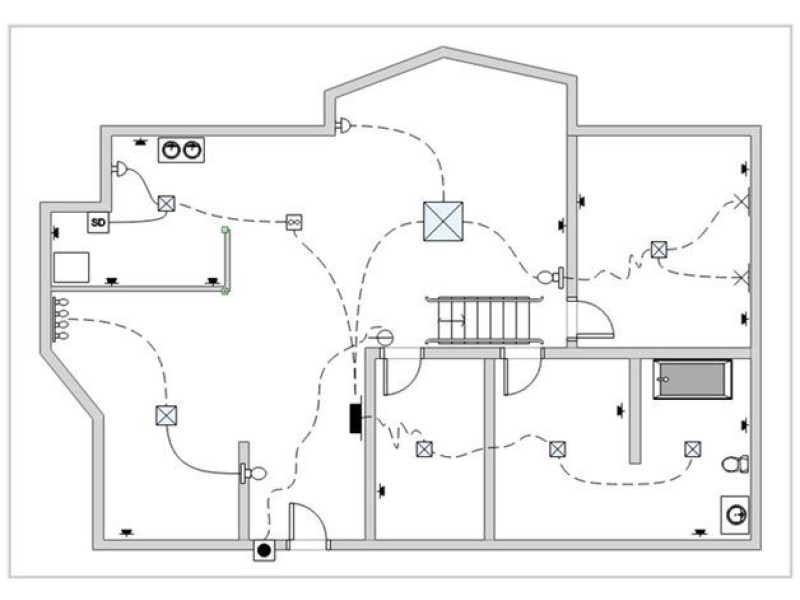
2. Designing the Wiring Diagram
2.1 Where to Start
Every apartment has a main supply feed (possibly near the front door or in a dedicated utility room). You’ll create a diagram that illustrates:
- Distribution panel location (breaker box)
- Lines feeding lighting circuits, outlet groups, and high-power appliances
- Positions of outlets, switches, and fixtures
Many new-build owners prefer separate circuits for:
- Lighting (kitchen, hallway, living areas, bedrooms)
- Bathroom (often includes water heater, heated floors)
- Kitchen outlets (includes high usage for cooking appliances)
- Major appliances (electric stove, oven, washing machine)
2.2 Software (Optional)
You can draw your layout by hand or use dedicated tools:
- Paid: Visio, AutoCAD, Eagle, etc. (demo versions might suffice for small projects)
- Free: QElectroTech, “Mobile Electrician” (Android), or online CAD tools
- Brand-Specific: Schneider Electric’s Rapsodie, Legrand’s XL Pro
Regardless of the tool, focus on clarity—easy labeling of cable routes and circuit designations.
3. Choosing Materials: Cable, Breakers, and More
Once you have a draft wiring diagram, calculate material needs:
Cable Length
- Measure the distance between panel, junction boxes, outlets, switches, and fixtures.
- Add ~10–15% extra for slack and unexpected changes.
Conduits, Grommets, and Junction Boxes
- Estimate the total length of flexible conduits or raceways for embedded or open runs.
- Count the number of junction boxes and fittings.
Breakers (MCBs) and RCDs
- Plan for at least 4–6 breakers: one for each big appliance, plus general lighting and general outlets.
- High-power loads (oven, AC, water heater) often need a dedicated circuit with a higher amp breaker (20–32 A or more).
- RCD/GFCI devices or RCBOs (combined breaker + RCD) provide ground-fault protection, particularly important in bathrooms and kitchens.
Outlets, Switches, and Fixtures
- Standard outlets often need 16–20 A rating.
- Heavier appliances might use 25–32 A (or more).
- Switches typically have 10–16 A capacity, though modern lighting rarely exceeds that.
Purchasing all materials at once can reduce costs and ensure consistent quality.
4. Key Stages of Installation
4.1 Marking and Layout
Transfer the Diagram to Real Walls
- Mark each cable route, labeling the type of cable you plan to install.
- Clearly indicate positions for junction boxes, light fixtures, outlets, and switches.
Follow Straight Lines
- Horizontal runs typically 50 cm below the ceiling.
- Vertical runs drop down from boxes or corner lines—avoid diagonal shortcuts.
4.2 Cutting Channels (Chasing or “Штробление”)
Cut channels where cables or conduits will sit:
- Wall Chaser: Best tool for neat, straight grooves. Renting one is cost-effective if you have much to chase.
- Angle Grinder + Rotary Hammer: Common combo if no wall chaser is available.
- Use a masonry disc on the grinder for cutting lines, then remove material with a perforator and chisels.
Take care not to cut too deep into structural elements—most building codes limit chase depth.
4.3 Cable Routing and Securing
- Run Each Circuit Cable from the distribution panel to the designated junction box or directly to high-load appliances.
- Use the Correct Gauge
- Outlets and lighting circuits often use 2.5 mm² (or 1.5 mm² for lighting).
- High-power lines (oven, washer) might be 4–6 mm².
- Attach Cables
- In the channels (штробы), secure cables with plaster spots or clamps.
- Keep it flush or slightly below the wall surface to allow for filling and finishing.
For direct connections to heavy appliances, run the cable straight to the panel’s dedicated breaker, bypassing secondary boxes.
4.4 Connecting to the Breaker Panel
Inside your main breaker panel:
- Separate lighting circuits, outlet circuits, and high-load appliance lines.
- Each circuit has its own MCB (miniature circuit breaker).
- Add RCD/GFCI protection as needed, especially in wet areas (bathroom, kitchen).
- Make sure to label each breaker clearly (e.g., “Kitchen Outlets,” “Living Room Lighting”).
Pro Tip: Only qualified electricians should connect to the main building supply or meter. Unauthorized tampering may breach local regulations and pose safety risks.
5. Final Tips for Success
- Follow the Plan
- Reducing “improvised” changes lowers confusion and ensures consistent load calculations.
- Document Everything
- Keep a record of cable routes and breaker panel labeling.
- Photographs of open walls help future renovations or repairs.
- Mind Safety
- Wear appropriate PPE (goggles, gloves) when chasing or drilling.
- De-energize lines at the panel when doing any connection or modification.
By managing the wiring yourself or hiring trusted professionals, you gain better control over component quality and circuit layout. This leads to a safer, more reliable, and future-ready electrical system.
Where to Find Quality Electrical Components?
At safsale.com, we provide:
- Reliable cables (copper, flame-retardant jackets, various gauges)
- Conduits, junction boxes, and fittings for neat and safe installations
- Breakers, RCDs/GFCIs, and surge protectors to secure your circuits
- Expert advice to help you match local codes and best practices
Set up a durable and safe wiring system in your new apartment with safsale.com—your one-stop shop for all electrical needs.