Category Description:
Setting up an IP camera system can seem complex, but it becomes straightforward with the right guidance. This article explores the various ways to connect IP cameras, including wiring to a recorder or accessing them over the internet. Learn the best practices for powering cameras using PoE or separate power supplies, connecting through switches, and ensuring reliable remote access for video surveillance.
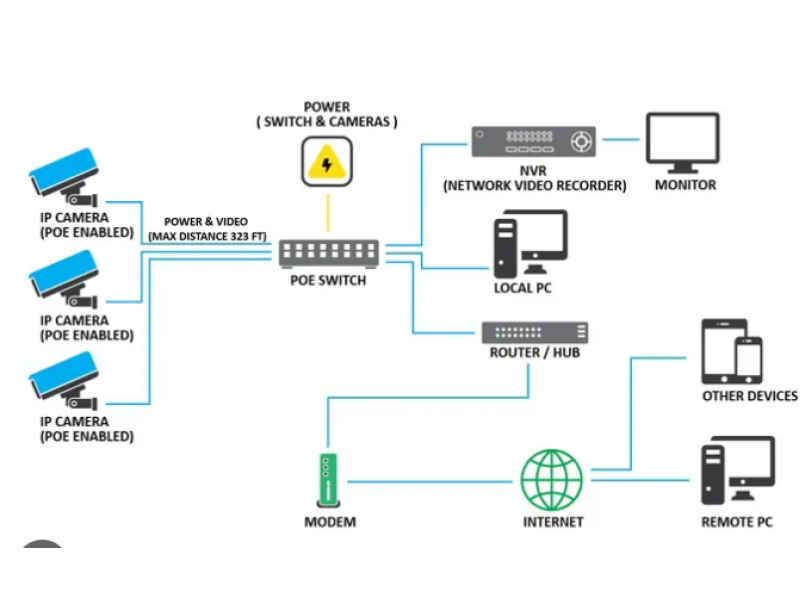
How to Connect IP Cameras to a Recorder and Internet
Wiring IP Cameras to a Recorder
IP cameras can be connected to video recorders (NVRs) in two primary ways, depending on your system design and equipment:
Direct Connection to the NVR:
- Use Ethernet cables to connect each camera directly to the NVR’s PoE ports. This setup powers the cameras and transmits video over a single cable, making it a clean and efficient solution.
- For cameras not supporting PoE, connect them to a separate power supply while routing video through the Ethernet cable.
Connection via a Network Switch:
- Cameras are connected to a network switch (PoE-enabled or standard).
- The switch is then linked to the NVR, which handles video recording and management.
Advantages: Using a network switch allows for flexible camera placement, especially in large or distributed systems.
Powering IP Cameras
IP cameras can be powered using two primary methods:
Separate Power Supply:
- Cameras come with a dedicated connector for a power adapter.
- This method is straightforward but requires additional wiring for power.
Power over Ethernet (PoE):
- PoE technology combines power and video signal transmission over a single Ethernet cable.
- Requires PoE-compatible equipment, such as switches, injectors, or NVRs with built-in PoE support.
Pro Tip: Use a PoE splitter if you need to separate the power and data signals at the camera end.
Connecting IP Cameras to the Internet
For remote monitoring and internet access, your IP cameras must connect to a router. Here are four common setups:
Through a Recorder:
- Connect the recorder to the internet via a router.
- Cameras transmit video to the recorder, which then streams to authorized devices.
Directly Through a Switch:
- Cameras connect to a network switch, and the switch connects to a router for internet access.
- This setup is common in systems without recorders but may require cloud or server storage for video archiving.
Hybrid Setup with a Switch and Recorder:
- Cameras and the recorder connect to a shared switch, which is linked to the router.
- This allows for centralized video management and recording with remote accessibility.
Direct Internet Connection:
- Each camera connects directly to the router.
- This method is simple for standalone cameras but requires a robust network setup for multiple devices.
Note: Remote access often requires a static IP address or dynamic DNS setup for consistent connectivity. Alternatively, cloud services can simplify remote access.
Best Practices for Network Configuration
Cable Type:
- Use high-quality Ethernet cables like Cat6 for long distances to reduce signal degradation.
- Ensure all connectors are securely crimped and fit snugly into RJ-45 ports.
Router Setup:
- Configure port forwarding on your router to enable remote access to cameras and recorders.
- Secure the system with strong passwords and regular firmware updates.
Network Management:
- Assign static IP addresses to all cameras for consistent connectivity.
- Use VLANs (Virtual Local Area Networks) in larger setups to segment camera traffic from other devices.
Conclusion
Setting up IP cameras for video surveillance is a flexible and scalable solution for homes and businesses. Whether you're connecting cameras to a recorder for centralized storage or accessing them directly over the internet, understanding the wiring and configuration options is key to creating a reliable system.
Explore more advanced setups and troubleshooting tips on safsale.com.