How to Connect a Camera to a Router
Setting up an IP camera with a router is the first step toward creating a reliable home surveillance system. Once connected, you can monitor your camera locally or access it remotely over the internet. Here's how to do it:
Step 1: Verify or Determine the Camera’s IP Address
Known IP Address:
Ensure the IP address matches the router’s subnet and doesn’t conflict with other connected devices. For example:- Router:
192.168.0.1 - Camera:
192.168.0.100 - Computer:
192.168.0.102
- Router:
Unknown IP Address:
Use a network scanning tool like Search Tool to detect the camera’s address. Alternatively, log into your router’s admin panel to view connected devices.
Note: If the camera’s default IP address is on a different subnet (e.g., 192.168.1.x vs. 192.168.0.x), adjust the address to match the router’s subnet.
Step 2: Connect the Camera to the Router
For Wired Connections:
Use an Ethernet cable to connect the camera to the router. Ensure the router’s port is functional.For Wireless Cameras:
Initially, connect the camera via Ethernet for setup. Access the camera’s network settings and enable WiFi. Enter the network SSID and password, save the changes, and disconnect the cable.
Step 3: Configure Network Settings
Access the camera’s web interface by entering its IP address in a browser. Common login details are:
- Default username: admin
- Default password: admin (change this for security)
Navigate to Network Settings and:
- Assign a static IP (if needed).
- Enable DHCP if dynamic IP assignment is preferred.
- Configure the gateway (usually the router’s IP).
Connecting Multiple Cameras
If connecting multiple cameras:
- Enable DHCP for automatic IP assignment.
- Use a network switch if the router lacks enough ports.
- Avoid IP conflicts by checking each device’s address.
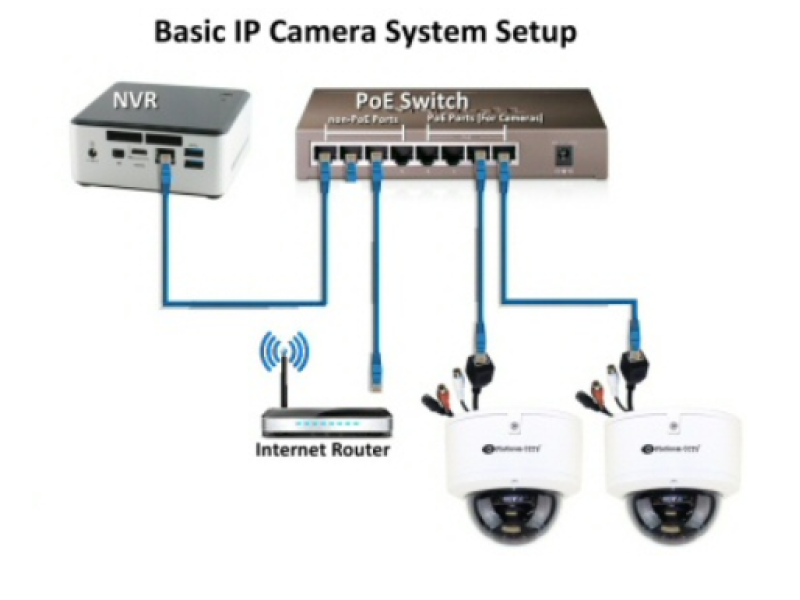
Connecting PoE Cameras
If your router doesn’t support PoE (Power over Ethernet), use a separate PoE injector or connect the camera to a PoE-enabled switch. Most PoE cameras also have a standard power adapter option.
Common Questions
Can I connect an analog camera to a router?
Analog cameras require a DVR (Digital Video Recorder) with an Ethernet port to connect to a router. Once connected, the DVR’s settings are configured similarly to IP cameras.What if my router doesn’t support PoE?
Use a PoE injector or power the camera using its standard adapter. PoE simplifies cabling by transmitting power and data over a single cable.Can I connect cameras wirelessly?
Yes, WiFi cameras connect to routers without cables. However, initial configuration often requires a wired connection. Ensure strong signal coverage for reliable performance.
Final Thoughts
Connecting cameras to a router is straightforward with proper network configuration and tools. Whether you're setting up a single camera or a multi-camera system, following these steps ensures smooth operation and scalability.
For advanced setups, including cloud-based monitoring and hybrid systems, explore high-quality solutions on safsale.com