Wiring an electrical switch might seem tricky, but with the right guidance, it’s a straightforward task. This guide breaks down the process to ensure both safety and efficiency.
Understanding the Basics
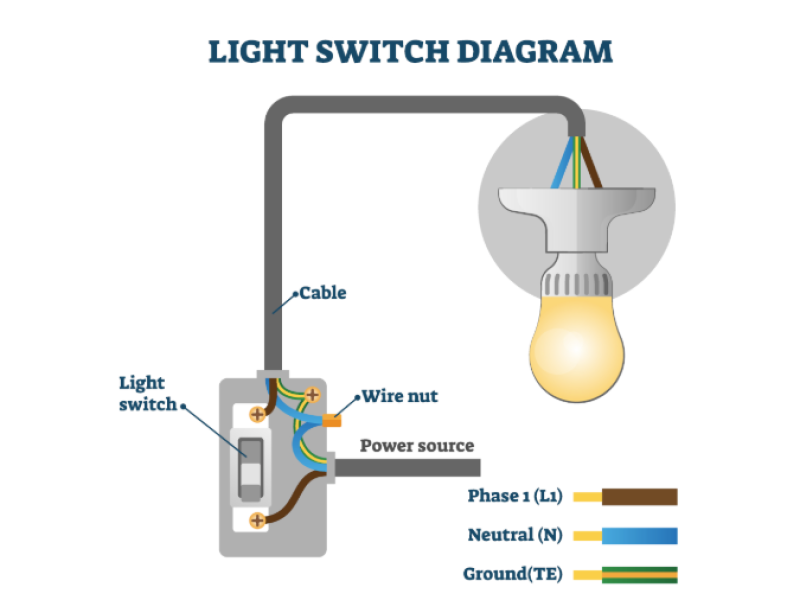
An electrical switch is connected by interrupting the circuit's live (hot) wire. For safety, the switch should always be installed on the phase (hot) wire rather than the neutral. This reduces the risk of electric shock when servicing fixtures like lights or fans.
Tools You'll Need:
Voltage tester
Screwdrivers
Wire strippers
Electrical tape
Marker for labeling wires
Step-by-Step Wiring Instructions:
Turn Off the Power:
Shut off the circuit breaker for the area you'll be working on. If you're unsure which breaker controls the circuit, switch off the main breaker. Use a voltage tester to confirm there's no live current before proceeding.Identify the Wires:
In most residential setups, you'll encounter three types of wires:Hot (Live) Wire: Usually black or red.
Neutral Wire: Typically white.
Ground Wire: Green or bare copper.
Always verify the live wire with a voltage tester.
Wiring a Single-Pole Switch:
Connect the hot (live) wire to one of the brass terminals on the switch.
The other brass terminal connects to the load wire leading to the light fixture.
Ground the switch by attaching the ground wire to the green screw.
Wiring a Double-Pole Switch:
For switches controlling two circuits:Connect two separate hot wires to the two brass terminals.
The neutral wires are usually connected in the junction box, not on the switch.
Secure the ground wire to the green terminal.
Secure the Wires:
After making connections, tuck the wires neatly into the electrical box. Ensure no bare wire is exposed outside the terminal screws.Reattach the Cover Plate:
Screw the cover plate back on to protect the switch and wires.Restore Power and Test:
Turn the breaker back on and test the switch to ensure it operates correctly.
Safety Tips:
Always double-check that the power is off before touching any wires.
Use proper tools and wear insulated gloves if necessary.
Label wires if you're working with multiple circuits to avoid confusion.
Troubleshooting Common Issues:
Switch Not Working? Check for loose connections or faulty wiring.
Lights Flickering? Ensure wires are securely fastened and the switch is rated for the load.
When to Call a Professional:
If you're unsure about any part of the process or if the wiring seems complex (especially in older homes), it's best to consult a licensed electrician.
For more tips on home electrical safety and quality products, visit safsale.com.