Video Intercom Systems are essential for modern residential and commercial security, enabling secure and convenient access control. Whether for a private home, apartment building, or office complex, understanding what constitutes a complete video intercom system kit is crucial for effective installation and operation. This guide explores the essential components of video intercom kits, different types available, selection criteria, and best practices for installation to help you choose the right system for your security needs.
What Should Be Included in a Video Intercom System Kit?
When considering a video intercom system kit, it's important to understand that the term "kit" can be interpreted in two ways:
- Functional Composition: Refers to the set of equipment needed to accomplish specific access control tasks.
- Complete Package: Refers to a ready-made bundle of all necessary components required for installation.
Most users seeking a video intercom kit are interested in the second interpretation-a complete set of components that ensure compatibility and ease of installation. Here's what a typical video intercom kit should include:
Essential Components:
Video Intercom Monitor:
- Description: The central unit that displays video feeds and facilitates communication.
- Features: Varies in size, resolution (color or black-and-white), and may support multiple external panels and additional surveillance cameras.
- Connectivity: Often includes support for memory cards to store visitor images, enhancing security by keeping records even when homeowners are away.
External Call Panel:
- Description: The unit installed at the entrance, equipped with a video camera, speaker, microphone, and call button.
- Features: Includes a camera with a wide viewing angle (typically 70° to 180°) to capture a broad area, ensuring better visibility of visitors.
Electric Lock:
- Types: Electromagnetic or electromechanical locks.
- Functionality: Allows remote unlocking of doors, gates, or entry points from the monitor unit.
- Power Supply: May require a separate power source or be integrated into the kit.
Installation Accessories:
- Description: Includes all necessary connectors, cables, and mounting hardware.
- Importance: Ensures seamless and secure installation, minimizing compatibility issues.
Additional Components (Optional):
Controllers and Access Readers:
- Description: Devices like Touch Memory keys or Proximity card readers for enhanced access control.
- Functionality: Allow users to gain access without initiating a call, providing convenience and increased security.
Additional Cameras:
- Description: For expanded surveillance coverage.
- Functionality: Enables monitoring of multiple areas, such as garages or surrounding property.
Benefits of Ready-Made Kits:
- Guaranteed Compatibility: All included components are designed to work seamlessly together, reducing installation complexities.
- Cost-Effective: Purchasing a complete kit often proves more economical than buying individual components separately.
- Ease of Installation: Simplifies the setup process, especially for those new to intercom systems.
Types of Video Intercom System Kits
Video intercom system kits come in various configurations to suit different environments and security needs. Understanding the different types can help you select the most appropriate system for your specific requirements.
1. Kits for Private Homes and Apartments
Features:
- Single or Multiple External Panels: Suitable for homes with one entrance or multiple access points.
- Basic to Advanced Monitors: Range from simple displays to high-definition touchscreens.
- Support for Additional Cameras: Enables monitoring of adjacent areas like garages or backyards.
Use Case:
Ideal for single-family homes or multi-unit apartments where individual apartments require separate access controls.
2. Kits for Multi-Unit Buildings
Features:
- Coordinate Video Intercoms: Designed to handle multiple apartments with a single central control unit.
- Switchboards (Commute Stations): Facilitate routing of calls from multiple external panels to respective internal monitors.
- Scalability: Easily add more units as the building expands or as security needs evolve.
Use Case:
Perfect for apartment complexes, office buildings, or commercial spaces with multiple entry points and numerous users.
3. Smart Home Integrated Kits
Features:
- Smart Device Compatibility: Integrates with smartphones, tablets, and other smart devices for remote access and control.
- Home Automation Integration: Connects with other smart home systems like lighting, HVAC, and security cameras.
- Biometric Authentication: Supports fingerprint or facial recognition for enhanced security.
Use Case:
Suitable for tech-savvy homeowners looking to integrate their intercom system with a broader smart home ecosystem.
4. Wireless and IP Video Intercom Kits
Features:
- Wireless Communication: Eliminates the need for extensive cabling, offering flexibility in installation.
- IP Protocol Support: Enables remote access and control over the internet, allowing monitoring from anywhere.
- Expandable Network: Can connect multiple devices across different locations within the property.
Use Case:
Ideal for existing homes or buildings where running new cables is impractical, and for users seeking remote management capabilities.
Selection Criteria for Video Intercom System Kits
Choosing the right video intercom system kit involves evaluating several factors to ensure the system meets your security needs, budget, and functional requirements.
1. Determine Your Security Needs
- Access Points: Assess the number of entry points requiring access control.
- User Base: Consider the number of users who will interact with the system.
- Surveillance Coverage: Decide if additional cameras are needed for comprehensive monitoring.
2. Evaluate Functional Requirements
- Communication Needs: Choose between audio-only or audio-video intercoms based on the level of interaction desired.
- Integration Capabilities: Ensure compatibility with other security systems like CCTV cameras, alarms, and smart home devices.
- User Interface: Opt for systems with intuitive interfaces, such as touchscreens or easy-to-use buttons.
3. Consider Technical Specifications
- Power Supply: Determine if the system requires a direct electrical connection or can operate on batteries.
- Connectivity Options: Decide between wired and wireless systems based on installation feasibility and reliability.
- Operating Range: For wireless systems, ensure the operating range covers the entire property effectively.
4. Assess Durability and Weather Resistance
- Material Quality: External panels should be made from corrosion-resistant and impact-resistant materials.
- IP Rating: Look for systems with a high Ingress Protection (IP) rating, such as IP67, indicating protection against dust and water ingress.
5. Review Brand Reputation and Support
- Reliable Brands: Choose brands known for quality, durability, and customer support.
- Warranty and Service: Ensure the kit comes with a comprehensive warranty and access to reliable customer service for troubleshooting and repairs.
- User Reviews: Consider feedback from other users regarding performance, reliability, and ease of installation.
6. Budget Constraints
- Initial Costs: Balance the cost of the intercom system against its features and reliability.
- Long-Term Expenses: Consider maintenance costs, potential upgrades, and the cost of professional installation if required.
7. Aesthetic and Design Considerations
- Design Compatibility: Select an intercom system that complements the architectural style and aesthetics of your home or building.
- Mounting Options: Choose between recessed or surface-mounted panels based on installation preferences and space availability.
Installation and Connection of Video Intercom System Kits
Proper installation and connection of video intercom system kits are crucial to ensure their effective and secure operation. Below are detailed guidelines for installing intercom systems, connecting to existing setups, and best practices to ensure system safety and reliability.
1. Installation of Intercom Components
a. Installing the External Call Panel
Steps:
Choose the Optimal Location:
- Select a location near the main entrance or gate for easy access by visitors.
- Ensure the external panel is mounted at a convenient height, typically between 4.5 to 5.5 feet from the ground, to accommodate both adults and children.
Mounting the Call Panel:
- Secure the panel to a sturdy surface using tamper-proof screws and brackets to prevent unauthorized removal.
- Attach the protective hood to shield the panel from weather elements like rain, snow, and direct sunlight.
Connecting to Power Supply:
- If the system requires external power, connect the call panel to a stable power source using the provided adapter.
- For systems with built-in batteries, ensure the batteries are properly installed and charged.
Network Connection:
- Connect the external panel to the local network using an Ethernet cable if required.
- Configure the network settings according to the manufacturer’s instructions to ensure proper communication with the internal unit and other networked devices.
b. Installing the Central Control Panel (Monitor)
Steps:
Determine the Ideal Location:
- Position the monitor in a central area of the home, such as the living room or near the main entrance, for easy access and visibility.
- Ensure the unit is at a comfortable viewing height, typically between 4 to 5 feet from the floor.
Mounting the Internal Panel:
- Secure the panel to the wall using screws, ensuring it is level and easily accessible.
- Conceal any necessary cables using cable clips or conduits to maintain a clean appearance.
Connecting to Power and Network:
- Connect the internal unit to the power supply and local network according to the installation manual.
- For wireless systems, ensure the internal unit is properly paired with the external call panel and connected to the network.
Integrating with Locking Devices:
- Connect the intercom system to the electromagnetic or electromechanical locks following the specific wiring instructions provided by the manufacturer.
- Test the lock operation to ensure seamless integration with the intercom commands.
2. Connecting to Existing Systems
If your property already has an existing intercom or access control system, integrating your new video intercom requires careful planning and consideration.
Steps for Integration:
Determine System Compatibility:
- Identify the type of existing system (analog, digital, wireless) and ensure the new intercom system is compatible.
- Consult with the existing system’s manufacturer or a professional installer for integration guidelines.
Consult with the Service Provider:
- Contact the company responsible for the existing intercom system to discuss compatibility and integration options.
- Obtain necessary permissions and technical support for seamless integration.
Wiring Considerations:
- Use compatible wiring standards and protocols to connect the new intercom to the existing system.
- Avoid mixing different communication standards to prevent signal interference and system malfunctions.
Configuration and Programming:
- Program the new intercom unit to recognize and communicate with the existing system’s controller.
- Test the integration to ensure proper functionality and seamless operation.
Troubleshooting:
- Address any issues related to signal interference, alignment, or communication between units.
- Seek professional assistance if integration challenges arise.
3. Best Practices for Installation
Professional Installation:
- While DIY installation is possible for simple systems, hiring certified professionals ensures precise alignment, secure mounting, and proper wiring.
- Professionals can also provide valuable insights and recommendations tailored to your specific security needs.
Regular Maintenance:
- Schedule routine inspections of the intercom system to identify and address any wear, alignment issues, or electrical problems.
- Clean and lubricate mechanical parts to maintain smooth operation.
Secure Wiring:
- Route cables through concealed pathways to protect them from physical damage and unauthorized access.
- Use high-quality, durable cables that can withstand environmental factors and prevent voltage drops over long distances.
Backup Power Solutions:
- Implement Uninterruptible Power Supplies (UPS) or battery backups to maintain intercom functionality during power outages.
- Ensure backup power can sustain the intercom system for the required duration to allow safe evacuation.
Compliance with Standards:
- Follow the National Electrical Code (NEC) and other relevant standards during installation to ensure safety and compliance.
- Integrate the intercom system with fire alarm systems to facilitate safe evacuation during emergencies.
Ready-Made Video Intercom Kits
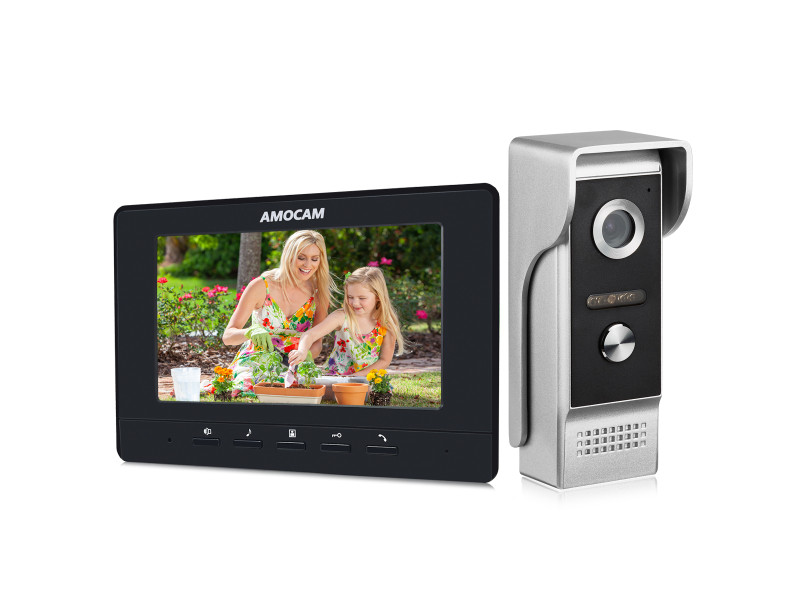
Most video intercom kits available today include the following components:
Monitor:
- Size: Measured in inches diagonally (e.g., 7”, 10”).
- Display Type: Color or black-and-white.
- Connectivity: Support for multiple external panels and additional surveillance cameras.
- Storage: May include memory card support for storing visitor images.
External Call Panel:
- Camera: Built-in with adjustable viewing angles.
- Audio: Speaker and microphone for two-way communication.
- Call Button: Initiates the communication process.
Key Parameters to Consider:
Monitor Features:
- Size and Resolution: Larger, high-resolution monitors offer better visibility and clearer images.
- Memory Card Support: Allows for recording and storing visitor images, enhancing security.
- Multi-Panel Support: Capability to connect multiple external call panels for comprehensive coverage.
- Interface Type: Handset-like buttons or modern hand-free (hands-free) audio technology.
External Call Panel Features:
- Number of Subscriber Support: Ability to independently call multiple monitors, essential for multi-unit buildings.
- Camera Specifications: Resolution and wide viewing angles (70° to 180°) to ensure broad coverage without significant image distortion.
- Lock Control: Supports both electromechanical and electromagnetic locks with appropriate power management.
Installation Types:
Recessed Panels:
- Pros: More aesthetically integrated and vandal-resistant.
- Cons: Requires precise placement and potentially more complex installation.
Surface-Mounted Panels:
- Pros: Easier to install, ideal for existing structures without modification.
- Cons: Slightly less secure and can be more susceptible to tampering.
Additional Considerations:
- Additional Cameras: Useful for monitoring surrounding areas beyond the main entrance.
- Wireless Kits: Offer flexibility in installation without extensive wiring.
- IP Systems: Enable remote access and integration with smart home technologies.
Additional Costs and Accessories
While ready-made kits offer a comprehensive set of components, additional expenses may arise from purchasing supplementary items such as:
- Cables and Connectors: Essential for connecting the intercom components, especially if customization is needed.
- Locks: If the kit does not include an electric lock, purchasing one separately is necessary.
- Power Supplies: Additional power units may be required for certain lock types.
- Mounting Hardware: Extra screws, brackets, or conduits for secure installation.
Tip: Ensure compatibility of all additional components with the kit to maintain system integrity and performance.
Final Thoughts
Video Intercom System Kits provide a robust solution for enhancing the security and convenience of residential and commercial properties. By understanding the essential components, different types available, and key selection criteria, you can choose a kit that best fits your specific needs. Whether for a private home, apartment building, or office complex, a well-chosen video intercom system kit ensures reliable access control and comprehensive monitoring.
Key Takeaways:
Understand the Components: Familiarize yourself with the main components of video intercom kits, including monitors, external call panels, electric locks, and installation accessories.
Choose the Right Type: Decide between different kit types (private home, multi-unit, smart home integrated, wireless/IP) based on your specific security requirements and installation environment.
Ensure Compatibility: Opt for ready-made kits to guarantee compatibility between all included components, simplifying installation and operation.
Consider Additional Features: Look for features like memory card support, multi-panel connectivity, and smart device integration to enhance system functionality.
Plan for Installation: Follow best practices for mounting, wiring, and configuring your intercom system to achieve optimal performance and security.
Account for Additional Costs: Budget for necessary accessories and supplementary components to ensure a complete and functional system.
Maintain Regularly: Conduct routine maintenance to ensure the longevity and reliability of your video intercom system.
Seek Professional Assistance: Consider hiring certified security professionals for installation and maintenance to ensure your system operates effectively and securely.
For expert assistance in selecting and installing video intercom system kits, ensuring compliance with relevant standards, or accessing comprehensive project documentation, visit safsale.com. Our specialists are ready to help you design and deploy reliable, compliant, and efficient access control solutions tailored to your specific security needs.
Important Notice on Standards
All referenced documents and standards in this guide are provided for informational purposes only and should not be used as official publications. For authoritative guidelines and legal requirements, always consult the official standards organizations or regulatory bodies.