Vintage Electrical Wiring: Characteristics, Pros & Cons, and Installation Tips
Vintage or retro electrical wiring evokes memories of a bygone era, offering a unique design aesthetic that many homeowners now seek to replicate. In American homes—especially in wooden houses or cottages—a retro wiring style can blend functionality with style, while also paying homage to mid-century design. However, this decorative approach comes with its own set of advantages and disadvantages. In this guide, we’ll explore what vintage wiring is, its benefits and drawbacks, and provide practical tips for its installation.
What Is Vintage (Retro) Wiring?
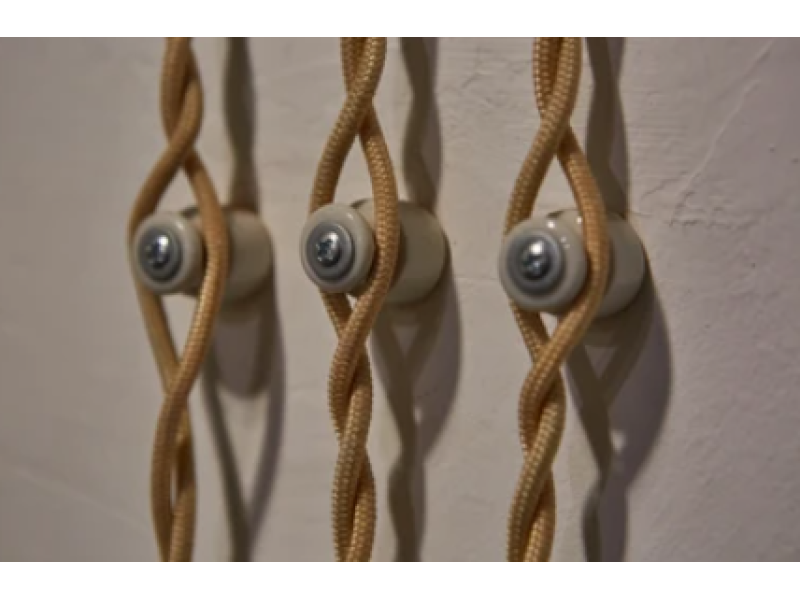
Vintage wiring refers to an open wiring system that mimics the electrical installations of mid-20th-century homes. Traditionally, this style was used in older wooden houses where:
- Single-core copper conductors were used, composed of many thin strands twisted together.
- The wires featured double insulation: an inner rubber layer followed by a fabric braid.
- The wiring was mounted on porcelain rollers or similar decorative supports, suspended approximately one inch (about 2.5 cm) from the wall or ceiling.
Today, vintage wiring isn’t just a practical installation—it’s an aesthetic statement. Modern manufacturers have even developed decorative cables that emulate the look of authentic retro wiring, available in various colors and textures (including cotton or silk braids and even woven fiberglass options). While these decorative options often come at a premium, they combine modern insulation technology with a classic look, ensuring higher thermal resistance and longer service life.
Advantages and Disadvantages of Vintage Wiring
Advantages:
Enhanced Safety for Wooden Structures:
Because vintage wiring is mounted on porcelain rollers and does not directly contact wooden surfaces, it minimizes the risk of fire—a critical benefit in wooden homes.Superior Cooling:
The open design allows for better air circulation around the cables, aiding in heat dissipation and maintaining a lower operating temperature.Ease of Damage Detection and Repair:
The wiring is exposed and easily inspected. Any damage, such as worn insulation or loose connections, can be quickly spotted and repaired.Aesthetic Appeal:
When integrated into a retro-themed interior, decorative vintage wiring adds a nostalgic charm. Today’s decorative options blend old-world style with modern safety standards.
Disadvantages:
Cost:
Decorative retro wiring products are generally more expensive than standard cables, largely due to the specialized materials and finishes.Installation Complexity:
The need for precise alignment (using tools like a laser level) and evenly spaced mounting of porcelain rollers can make installation labor-intensive.Limited Applications:
Retro wiring is best suited for low-power circuits (e.g., for switches, outlets, and lighting). High-power appliances still require standard, concealed wiring with thicker cables to handle increased current loads safely.
Installation Tips for Vintage Wiring
Planning Your Layout
- Design a Detailed Plan:
Create a floor plan that clearly marks the routes for your wiring, along with the locations of outlets, switches, and light fixtures. - Highlight Visible Areas:
Since the retro wiring will be a decorative element, plan to use it in areas that are clearly visible—such as along walls in living spaces or near vintage-style switches and fixtures. - Separate Circuits:
For high-power appliances (e.g., kitchen ranges, HVAC units), install a standard hidden wiring system. Use vintage wiring only for circuits where lower currents and aesthetic appeal are key.
Selecting Materials
- Wires:
Use UL-listed copper wires with modern insulation. While the interior look should be vintage, the performance must meet current safety standards. - Decorative Coverings:
Choose decorative outer layers such as fabric braids or woven fiberglass covers that provide a retro look without compromising durability. - Mounting Hardware:
Install porcelain or decorative rollers at consistent intervals (typically about 20 inches apart) using laser levels to ensure precise, even placement.
Installation Process
- Prepare the Surface:
Mark the cable routes on your walls or ceilings. Ensure that the surfaces are smooth and that you’ve planned for any adjustments. - Mount the Rollers:
Secure the decorative rollers at the marked intervals using appropriate fasteners (screws for wooden surfaces, anchors for masonry). - Lay the Wiring:
Run the vintage wiring along the rollers, ensuring it remains taut to avoid sagging or unsightly bends. For aesthetic purposes, keep the wires as close to the wall as possible—usually about 1 inch away. - Connect to Electrical Boxes:
For areas where vintage wiring meets standard outlets or switches, use proper connectors and junction boxes that blend with the overall design. - Final Inspection:
Verify all connections, ensure that wiring is securely mounted, and test the circuits with a multimeter. It’s always wise to have a licensed electrician inspect the work for compliance with NEC standards.
Conclusion
Vintage electrical wiring offers a charming, nostalgic look while still meeting modern safety requirements when done correctly. Its open design, excellent cooling properties, and ease of inspection make it ideal for decorative applications in wooden homes. However, due to higher costs and installation complexities, it is best used selectively—primarily for low-power circuits like lighting and decorative outlets—while high-power appliances should be wired with conventional, concealed methods.
For top-quality wiring components and further expert advice on vintage and modern electrical installations, visit safsale.com. Whether you’re enhancing your home's aesthetic or embarking on a full wiring upgrade, ensure you balance style with safety.
Remember: When in doubt, always consult a professional electrician to ensure that your installation complies with all safety codes and standards.