Guide to Installing IP Surveillance Systems
IP surveillance systems are increasingly popular for their high-resolution imaging, scalability, and advanced features like remote access. Proper installation and configuration are crucial to achieving reliable and efficient operation. This guide provides detailed insights into setting up IP cameras, including using PoE technology for streamlined connections.
1. Key Steps in IP Surveillance Installation
The installation of IP surveillance systems involves the following operations:
- Camera Installation: Secure placement of cameras at predetermined locations.
- Cable Routing: Laying signal and power lines.
- Additional Equipment Installation: Configuring components like power supplies, switches, and injectors.
- System Integration: Connecting all elements to a network video recorder (NVR) or server.
2. Connecting IP Cameras
Using Ethernet Cables
IP cameras connect to the network via Category 5e or Category 6 Ethernet cables, using 8P8C (commonly called RJ-45) connectors.
Steps to Prepare the Cable:
- Strip the Outer Insulation: Remove 2.5-4 cm of the cable’s outer sheath.
- Separate and Arrange Wires: Follow the T568B wiring standard:
- White/Orange
- Orange
- White/Green
- Blue
- White/Blue
- Green
- White/Brown
- Brown
- Insert Wires into the Connector: Ensure each wire is correctly aligned, then insert into the RJ-45 connector.
- Crimp the Connector: Use a crimping tool to secure the connector.
- Test the Connection: Use a cable tester to verify proper connections.
3. Configuring Cameras Before Installation
IP Address and Network Settings
Each IP camera requires a unique IP address. Ensure addresses align with your network configuration.
For example:
- Network Range: 192.168.1.XXX
- Mask: 255.255.255.0
Use the manufacturer's configuration software to assign IP addresses that match your local network.
4. Connecting Cameras Through Switches
Switches are essential for distributing video signals in larger systems.
Common Network Topologies:
- Star: Each camera connects to a central switch. Simplifies bandwidth distribution.
- Tree: Hierarchical setup with multiple switches.
- Ring: Ensures redundancy but requires careful bandwidth management.
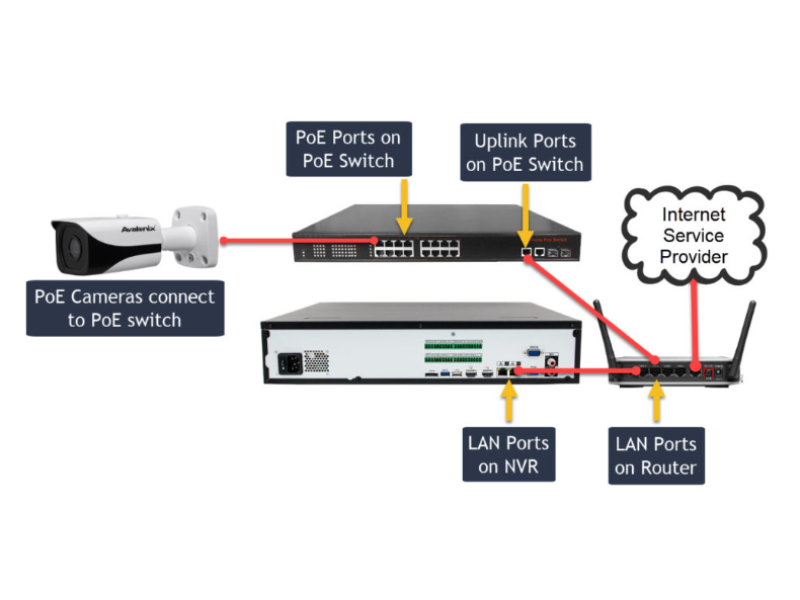
5. Using PoE (Power over Ethernet)
PoE Advantages:
- Simplified Installation: Power and data transmitted over a single cable.
- Cost Efficiency: Reduces the need for separate power lines.
- Scalability: Easy to add cameras without additional wiring.
PoE Implementation:
- PoE Injectors: Convert standard Ethernet connections into PoE-enabled ports.
- PoE Switches: Built-in PoE capability eliminates the need for separate injectors.
Best Practices for IP Surveillance Installation
- Use High-Quality Components: Ensure all cables, connectors, and devices meet industry standards.
- Optimize Placement: Position cameras to avoid blind spots and ensure adequate lighting.
- Ensure Network Compatibility: Check that switches and routers can handle the system’s bandwidth.
- Regular Maintenance: Periodically test connections, clean lenses, and update firmware.
Conclusion
IP surveillance systems provide a flexible and high-performance solution for modern security needs. By following best practices and leveraging technologies like PoE, you can create a reliable and scalable monitoring system.