Hooking Up Your DVR to a Computer
Two Main Options:
- Through a Local Network (LAN)
- Direct Connection
Before diving in, let’s figure out why you’d even want to do this. The main reason? Ditching the separate monitor and watching DVR footage straight from your PC.
But heads up! If you go for a direct connection, your PC won’t have internet while connected. If that’s cool with you, then here’s the lowdown:
Direct Connection
This setup is quick and dirty:
- Assign your computer and DVR different IP addresses within the same subnet.
- Use an Ethernet cable to connect them directly.
Pro Tips & Gotchas:
- You’ll need to tweak your PC’s IP settings. Go to:
Network & Internet → Network Connections → Adapter Settings → IPv4 Properties. - Select "Use the following IP address" and manually type in the IP and subnet mask.
If you’re already familiar with IP networks, this should be a breeze. If not, check out some beginner guides on IP-based surveillance systems for the basics.
As for the DVR, here’s the deal:
- If it’s fresh out of the box, check the manual for default network settings.
- If the settings have been changed, you’ll need to hook up the DVR to a monitor and dig into its menu to check or reset them.
Cable Talk:
Here’s the kicker-your standard Ethernet cable (patch cord) might not cut it. In some cases, you’ll need a crossover cable or DIY crimp one yourself.
Not feeling the DIY vibes? Grab an unmanaged network switch (a simple, plug-and-play splitter for Ethernet connections). This method works like a charm.
Once connected:
- Open your browser and type in the DVR’s IP address.
- Log in to the DVR’s web interface.
But wait! Don’t expect full access to your cams right off the bat. Most DVRs require additional software to view live footage.
The Catch:
Cheap, no-name DVR brands often have janky software that barely works (if at all). For reliable performance, stick to well-known brands that offer stable CMS (Central Management Software) for PC.
Connecting Through a Local Network
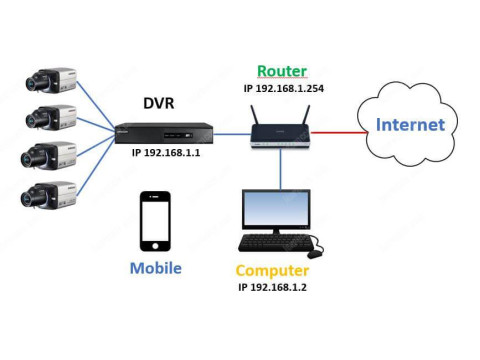
For a LAN setup, you’ll need a router (you probably already have one if you’ve got Wi-Fi at home).
Here’s how to hook it up:
- Plug the DVR’s Ethernet port into a free LAN port on your router using a patch cord.
- No free ports? Use a network switch to add more. Plug the switch into the router, then connect the DVR and other devices to the switch.
Network Settings:
Same idea as with a direct connection, but now you’ll also need to set the DVR’s:
- IP Address
- Subnet Mask
- Default Gateway (your router’s IP).
If your router has DHCP enabled (automatic IP address assignment), you can skip manual IP configuration for the DVR. Just turn on DHCP in the DVR’s settings and let it grab an IP from the router.
Accessing the DVR from Your PC
Once the connection’s good:
- Open a browser and type in the DVR’s IP.
- Log in to the web interface.
- For live footage, install the recommended software or CMS.
Bonus Tip: With a LAN setup, you can switch between managing the DVR and doing other tasks on your PC without any restrictions.
Extra Resources
- Surveillance via Smartphone
- Network Switch Basics
- Connecting Cameras to DVRs

