
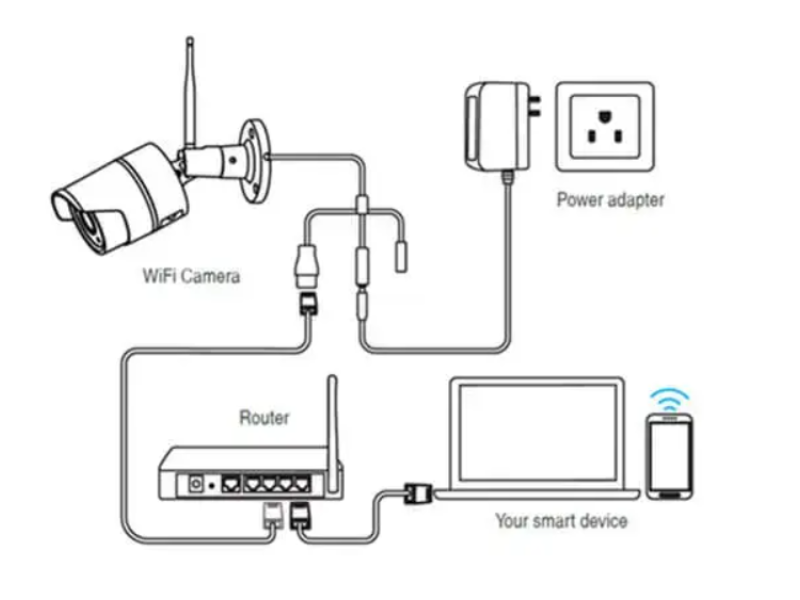
How to Install Surveillance Cameras – Step-by-Step Guide
Installing a surveillance camera system involves several key steps, from choosing the right equipment to configuring remote access. Whether for a private home, office, or outdoor location, the process requires proper planning and execution for optimal results.
Step 1: Choosing the Right Camera for Your Needs
Selecting the appropriate camera depends on:
Type of Camera:
- Analog Cameras: Require coaxial cables and DVRs.
- IP Cameras: Work over network protocols and can connect to the internet.
Resolution:
- 2MP (1080p) is sufficient for most home setups.
- Higher resolutions (4MP to 8MP) are ideal for detailed monitoring.
Protection:
- Outdoor cameras need an IP66 rating or higher to resist weather and dust.
- Indoor cameras can have lower protection levels.
Step 2: Equipment and Tools Needed
Required Components:
- Camera(s) with mounting kits.
- Power source: 12V DC adapter for analog, or PoE injector for IP cameras.
- Cables: Coaxial for analog, Cat5e or Cat6 for IP cameras.
- DVR/NVR for data storage and recording.
Tools for Installation:
- Drill, screwdrivers, cable stripper, and crimping tool.
- Level for proper alignment.
- Protective conduit for cable management.
Step 3: Planning Camera Placement
- Height and Positioning: Install cameras at 8-10 feet for security and optimal coverage.
- Lighting Considerations: Avoid direct sunlight or reflections. Use infrared cameras for low-light areas.
- Cable Routing: Plan a secure path for cables to avoid exposure to environmental damage.
Step 4: Installing and Connecting Cameras
Cable Management: Use conduits or cable channels to protect wiring.
Connections:
- For analog cameras, attach BNC connectors to coaxial cables.
- For IP cameras, connect via RJ45 plugs and ensure proper pin alignment.
Sealing and Protection: Use weatherproof boxes or tape to secure connections.
Step 5: Configuration and Testing
- IP Camera Setup: Configure network settings (IP address, subnet mask, gateway).
- Adjust Settings: Optimize brightness, contrast, and focus for clear images.
- Motion Detection: Enable and fine-tune motion detection to reduce false alarms.
Step 6: Data Storage and Recording
DVR/NVR Configuration:
- Select the recording mode: continuous, motion-triggered, or scheduled.
- Calculate storage needs based on resolution, frame rate, and retention period.
Storage Recommendations: Use surveillance-grade hard drives for reliability.
Step 7: Remote Access Configuration
- Router Setup: Forward necessary ports for remote camera access.
- Secure Access: Use strong passwords and enable two-factor authentication.
- Mobile Apps: Install manufacturer-provided apps for live monitoring and alerts.
Conclusion
Installing surveillance cameras is a detailed process that demands careful planning, from selecting the right equipment to configuring advanced features like remote access. Following these steps ensures a secure and efficient surveillance system tailored to your needs.
For long-term reliability, perform regular maintenance, including lens cleaning, software updates, and performance checks. A well-installed system will safeguard your property effectively for years to come.
Related products from Safsale
Continue from Academy guidance to live equipment and components available on Safsale.
 Reolink RLC-823A 8 Megapixel Outdoor PTZ IP Camera, 2.7-13.5mm LensView product
  Reolink Argus-2e Indoor/Outdoor Wire Free Smart Security Camera 1080pView product
  Hanwha Vision SND-6084 2MP Full HD Day/Night IP Dome Camera, 3-8.5mmView product
  Hikvision ECI-T24F2 4 Megapixel Network IR Outdoor Dome Camera, 2.8mm LensView product