How to Connect Surveillance Systems - Complete Guide
Connecting a surveillance system involves integrating various components such as cameras, recorders, power supplies, and cables. This article covers:
- Connecting Analog Cameras and Recorders.
- Using Twisted Pair Cables in Surveillance.
- Setting Up IP (Networked) Systems.
- Home Surveillance for Houses, Apartments, and Vacation Homes.
- Outdoor Surveillance Installation Tips.
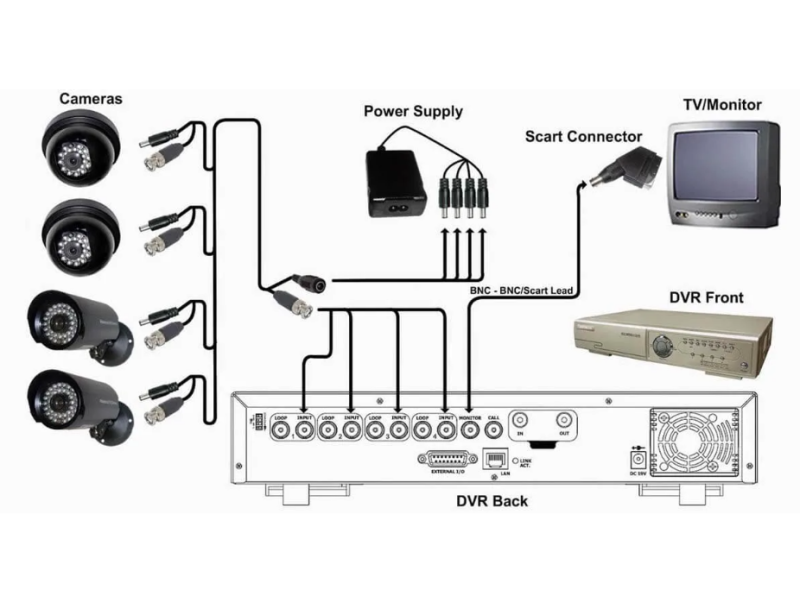
Connecting Analog Surveillance Systems
Analog systems connect each camera directly to a recorder (DVR) using coaxial cables. Here’s how:
- Cable Quality: Use coaxial cables with proper shielding (preferably copper) for minimal signal loss. Avoid low-quality aluminum or thin-shielded cables.
- Connectors:
- Screw-Type BNC: Simple but prone to wear over time.
- Crimp BNC: Secure and durable but requires a crimping tool.
- Solder BNC: Reliable but labor-intensive.
- Distance: Coaxial cables support up to 300 feet without amplifiers.
Using Twisted Pair Cables in Surveillance Systems
Twisted pair cables, commonly used in IP systems, can also support analog cameras with baluns.
- Advantages:
- Greater range (up to 3,000 feet with proper baluns).
- Better resistance to electromagnetic interference.
- IP Systems: Twisted pairs allow seamless integration of multiple cameras over one cable using switches.
Connecting IP Surveillance Systems
IP systems offer flexibility and scalability. Key steps:
- Connect Cameras: Use twisted pair cables with RJ45 connectors.
- Switches and PoE:
- PoE (Power over Ethernet): Simplifies installation by transmitting power and video over one cable.
- Use switches to expand the network and manage multiple cameras.
- Router Connection: For remote access, connect the system to a router with internet access.
Setting Up Home Surveillance
For Houses, Apartments, and Vacation Homes:
- Choose the Equipment: Analog systems are simpler for DIY, while IP systems allow for advanced features like mobile access.
- Install Cameras:
- Outdoor: Use weatherproof and vandal-resistant cameras. Install at least 8-10 feet above ground.
- Indoor: Mount cameras discreetly in corners for maximum coverage.
- Cabling:
- Outdoor cables should be housed in UV-resistant conduits or metal tubing for durability.
- Use combined coaxial/power cables for analog setups.
- Power Supply:
- Ensure adequate cable thickness to prevent voltage drops.
- Split large setups into groups with dedicated power lines.
Outdoor Surveillance Installation Tips
Weatherproofing:
- Use cameras with at least IP66 rating for dust and water resistance.
- Protect cables and connections with sealed junction boxes.
Vandal Protection:
- Opt for dome cameras with metal casings.
- Conceal wiring to prevent tampering.
Lightning Protection:
- Ground cables using metal conduits or surge protectors to minimize risks during storms.
Wide Coverage:
- Strategically place cameras to avoid blind spots. For perimeters, ensure overlapping coverage.
Connecting to the Internet for Remote Access
- Analog Systems: Connect the DVR to a router for remote viewing.
- IP Cameras: Directly link to the router or use a cloud service for easy access and storage.
Conclusion
Connecting surveillance systems-whether analog or IP-requires careful planning of cabling, power, and positioning. Proper installation ensures optimal performance and reliability, whether for a home, business, or outdoor area. By following these guidelines, you can confidently set up your system for effective monitoring and security.